=PROMPT() function, from writing your first simple prompt to processing thousands of rows of data. We’ll start with the basics and build up to more advanced features like batch processing and custom output formats.
Write your first prompt in Excel
Cellm’s=PROMPT() function outputs the AI response to a range of text, similar to how Excel’s =SUM() function that outputs the sum of a range of numbers.
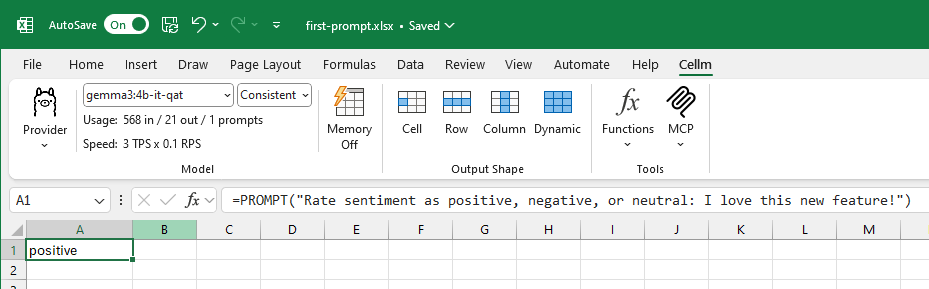
To get started, select a cell and write the formula =PROMPT("Rate sentiment as positive, neutral, or negative: I love cupcakes!"). The model will analyze the sentiment and return “positive” in the cell you selected:
Use data from your spreadsheet
Now that you know how to write a basic prompt, let’s use data that’s already in your spreadsheet. You can reference other cells in your=PROMPT() formula which lets you dynamically use other cells as context. To reference a single cell:
Single cell reference
Cell range reference
A1:C5 or A:A for an entire column.
Structure model output
When your prompt results in a list of answers (like “Extract all person names from the text”), Cellm can output each answer in its own cell. The=PROMPT.TOROW(), =PROMPT.TOCOLUMN(), and =PROMPT.TORANGE() functions output model responses as rows, columns, or in a rectangular grid. The Output Shape selectors in the Cellm ribbon let’s you quickly add one of these formulas to a selected cell or change an existing formula’s output format.
Format as rows or columns
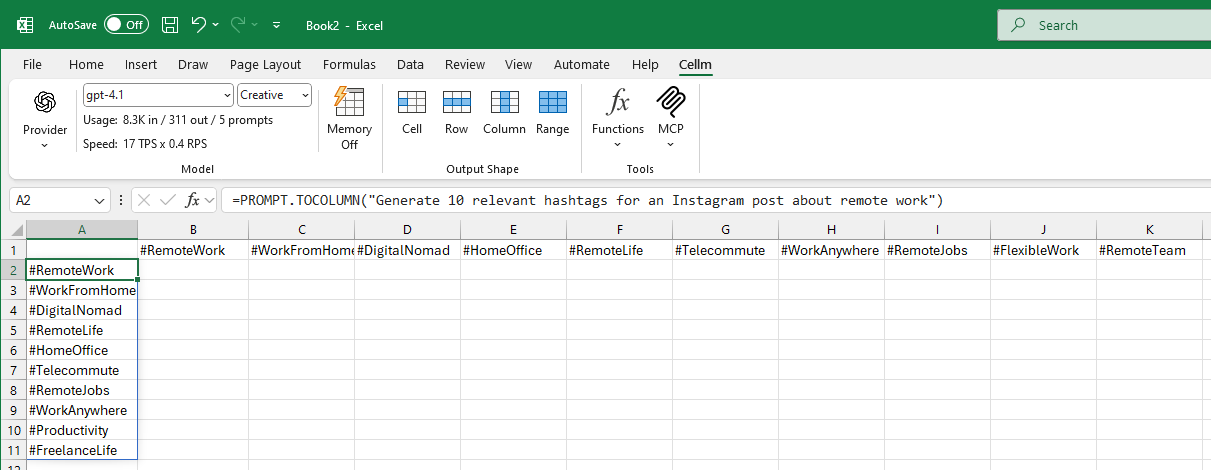
Use the=PROMPT.TOROW() or =PROMPT.TOCOLUMN() formulas to have Excel “spill” multiple values into other cells. For example, with the prompt:
Extract to row
- =PROMPT.TOROW(): Excel spills each feature into a new cell to the right (a row).
- =PROMPT.TOCOLUMN(): Excel spills each feature into new cells below (a column).
Format as a range
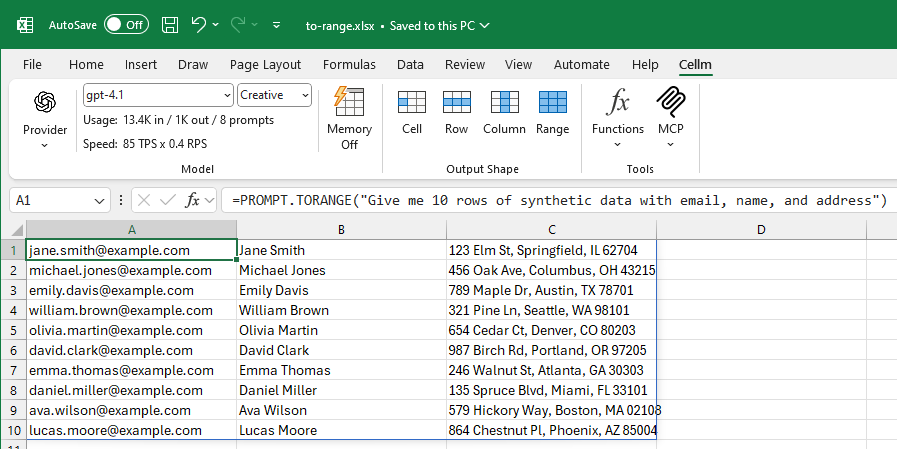
Use the=PROMPT.TORANGE() function when your output may span multiple rows and columns. You have two main ways to control the output:
- Let the model decide: You provide a general prompt and allow the model to determine the best row and column structure for its response.
- Specify the format: You include explicit instructions in your prompt to control the exact layout of the output, such as whether it should be a single row, a single column, or a table with a specific arrangement.
Example: Letting the model decide the format
To generate a table of synthetic data, you can use a prompt that describes the desired content and the number of rows. The model will then format the output in a rectangular grid. For example:Generate table
Example: Specifying the output format
You can be more specific in your prompt to ensure the data is returned in the exact format you need. For example, instruct the model to place the values in a row:Output as row
Output as column
Process many rows at once
Once you’re comfortable with cell references and output formats, you can scale up to process large amounts of data. You can apply the same prompt to many rows of data by dragging formulas across rows or columns. For example, you can import a CSV with a thousand news articles and put them in column A. In B1, write a formula like:Batch processing
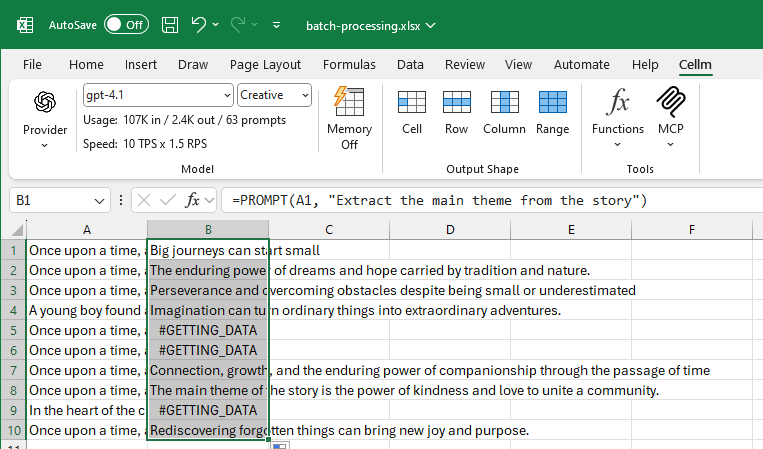
#GETTING_DATA means the prompt is queued up or has already been has been sent to the model and the cell is awaiting response.
Use specific models with PROMPTMODEL
For advanced workflows, you might want to use different AI models for different types of analysis. You can use a specific model in any cell with the=PROMPTMODEL() function. This function takes a provider and model as its first argument but is otherwise identical to =PROMPT().
The first argument consists of a provider and a model name separated by a forward slash (/). For example, if you want to use OpenAI’s cheapest model in a particular cell, you can write:
Specify model
Best practices
Now that you know how Cellm works, here are some guidelines for effective prompting: Do:- Experiment with different prompts to find the most effective instructions for your data.
- Use cell references to dynamically change your prompts based on other data in your spreadsheet.
- Use the output shape to format the structure of the model’s response and the prompt to define the content.
- Use local models for sensitive and confidential data.
- When processing many rows, verify at least a subset of a model’s responses. Models sometimes make errors and rely entirely on your input, which may also contain errors.
- Don’t use Cellm to compute sums, averages, and other numerical calculations. Combine Cellm with Excel’s other functions instead.
- Don’t use cloud providers to process sensitive or confidential data.
- Don’t use extremely long prompts or give Cellm complex tasks. A normal chat UI lets you have a back and forth conversation which is better for exploring complex topics.
- Don’t use Cellm for tasks that require up-to-date information beyond the AI model’s knowledge cutoff date unless you provide the information as context.
Next steps
You now have all the tools to use AI effectively in Excel. From here, you can explore more advanced features like function calling or learn how to choose the right model for your specific tasks.Breaking Down Tasks
Learn how to decompose your tasks into clear, manageable steps to improve AI reliability.
Choosing Model
Learn how to choose the right model for the right task.