> ## Documentation Index
> Fetch the complete documentation index at: https://docs.getcellm.com/llms.txt
> Use this file to discover all available pages before exploring further.
# Quickstart
> Get up and running with Cellm in minutes
## Install
To get started, you can quickly install Cellm and a local model:
Go to the [Github Release page](https://github.com/getcellm/cellm/releases) and download the latest `Cellm-AddIn-Release-x64.msi`
Run the installer to install Cellm on your computer.
Download and install [Ollama](https://ollama.com/) to run local AI models.
When you select an Ollama model in Cellm, it will prompt you to download it automatically. Alternatively, open the Windows Terminal and type `ollama pull gemma4:e4b` to download the Gemma 4 E4B model.
Cellm requires Windows 10 or higher, [Excel 2010 or higher](https://www.microsoft.com/en-us/microsoft-365/excel) (must be desktop app), and the [.NET 9.0 Runtime](https://dotnet.microsoft.com/en-us/download/dotnet/9.0). See the [Install](install.mdx) page for details.
## Cellm Ribbon
After installation, open Excel and look for the new **Cellm** tab in the ribbon menu. Use this tab to configure Cellm:
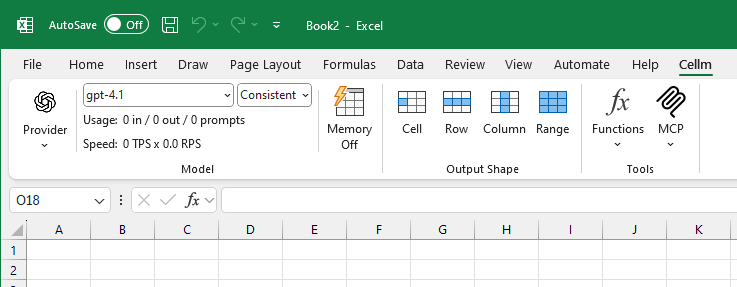 The ribbon has four main sections that control how Cellm works:
**Manage your Cellm account**
* **Login/Logout**: Log in to your Cellm account to use the Cellm provider, which handles model costs through your subscription
* **Create Account**: Sign up for a Cellm account to access all features
* **Manage Account**: Access your account settings
**Insert PROMPT formulas with different output shapes**
Click these buttons to insert a `=PROMPT()` formula in the active cell and open the function wizard:
* **Cell**: Output to a single cell (default)
* **Row**: Spill multiple values across cells to the right with `=PROMPT.TOROW()`
* **Column**: Spill multiple values down with `=PROMPT.TOCOLUMN()`
* **Range**: Let the model decide the output shape with `=PROMPT.TORANGE()`
If the active cell already contains a PROMPT formula, clicking these buttons changes the output shape while keeping your arguments.
**Configure which AI model to use and how**
* **Provider**: Select your model provider (OpenAI, Anthropic, Ollama, etc.). Click the provider icon to configure API keys and base URLs
* **Model**: Choose from preset models or type a custom model name
* **Temperature**: Control randomness (Consistent/0.0, Neutral/0.3, Creative/0.7, or any value 0.0-1.0)
* **Usage**: View input/output tokens and prompt counts for this session
* **Speed**: See average Tokens Per Second (TPS) and Requests Per Second (RPS)
* **Memory**: Toggle response caching. When on, identical prompts return cached results instantly, saving costs
**Enable tools that extend model capabilities**
* **Functions**: Built-in tools the model can use:
* **Internet Browser**: Let models browse the web
* **File Search**: Let models search for files on your computer
* **File Reader**: Let models read PDF, Markdown, and text files
* **MCP**: Add, configure, or remove Model Context Protocol servers for advanced integrations
## Usage
### Sending a prompt to a model
Sending prompts to a model is easy. Select a cell and type in its formula:
```mdx Text instruction theme={null}
=PROMPT("Extract the main topic from: The quarterly sales report shows a 15% increase in revenue across all departments")
```
The model will tell you that the main topic is sales.
### Combine your prompt with data from your spreadsheet
You augment your prompt with data from your spreadsheet by referencing cells in the prompt formula. . For example, try to copy a news article into cell A1 and type in the formula of cell B1:
```mdx Single cell context theme={null}
=PROMPT("Extract all person names mentioned in the text", A1)
```
The model will output person names in the news article in A1.
Try to copy another news article into cell A1 and hit enter. Watch how the formula recalculates. `=PROMPT()` formulas behave like any other built-in Excel function and re-run when its inputs change.
You can also use cell references to dynamically change your prompts. For example, try to fill many news articles into column A and then drag the fill handle of B1 down across many rows. Cellm will automatically send each article to the model and output the results in corresponding cells in column B.
You can reference a group of cells using standard Excel notation (this is called a "range"):
```mdx Range context theme={null}
=PROMPT("Extract all person names in the cells", A1:F10)
```
You can also reference multiple separate cell ranges:
```mdx Multiple ranges theme={null}
=PROMPT("Compare the data in these two tables", A1:C10, E1:G10)
```
### Spilling model response across multiple cells
You can use the `=PROMPT.TOCOLUMN()` function to spill the model response across multiple cells. For example, if you have text in cell A1, you can type in cell B1:
```mdx Spill to column theme={null}
=PROMPT.TOCOLUMN("Generate 10 relevant hashtags", A1)
```
This will put values in separate cells below.
The ribbon has four main sections that control how Cellm works:
**Manage your Cellm account**
* **Login/Logout**: Log in to your Cellm account to use the Cellm provider, which handles model costs through your subscription
* **Create Account**: Sign up for a Cellm account to access all features
* **Manage Account**: Access your account settings
**Insert PROMPT formulas with different output shapes**
Click these buttons to insert a `=PROMPT()` formula in the active cell and open the function wizard:
* **Cell**: Output to a single cell (default)
* **Row**: Spill multiple values across cells to the right with `=PROMPT.TOROW()`
* **Column**: Spill multiple values down with `=PROMPT.TOCOLUMN()`
* **Range**: Let the model decide the output shape with `=PROMPT.TORANGE()`
If the active cell already contains a PROMPT formula, clicking these buttons changes the output shape while keeping your arguments.
**Configure which AI model to use and how**
* **Provider**: Select your model provider (OpenAI, Anthropic, Ollama, etc.). Click the provider icon to configure API keys and base URLs
* **Model**: Choose from preset models or type a custom model name
* **Temperature**: Control randomness (Consistent/0.0, Neutral/0.3, Creative/0.7, or any value 0.0-1.0)
* **Usage**: View input/output tokens and prompt counts for this session
* **Speed**: See average Tokens Per Second (TPS) and Requests Per Second (RPS)
* **Memory**: Toggle response caching. When on, identical prompts return cached results instantly, saving costs
**Enable tools that extend model capabilities**
* **Functions**: Built-in tools the model can use:
* **Internet Browser**: Let models browse the web
* **File Search**: Let models search for files on your computer
* **File Reader**: Let models read PDF, Markdown, and text files
* **MCP**: Add, configure, or remove Model Context Protocol servers for advanced integrations
## Usage
### Sending a prompt to a model
Sending prompts to a model is easy. Select a cell and type in its formula:
```mdx Text instruction theme={null}
=PROMPT("Extract the main topic from: The quarterly sales report shows a 15% increase in revenue across all departments")
```
The model will tell you that the main topic is sales.
### Combine your prompt with data from your spreadsheet
You augment your prompt with data from your spreadsheet by referencing cells in the prompt formula. . For example, try to copy a news article into cell A1 and type in the formula of cell B1:
```mdx Single cell context theme={null}
=PROMPT("Extract all person names mentioned in the text", A1)
```
The model will output person names in the news article in A1.
Try to copy another news article into cell A1 and hit enter. Watch how the formula recalculates. `=PROMPT()` formulas behave like any other built-in Excel function and re-run when its inputs change.
You can also use cell references to dynamically change your prompts. For example, try to fill many news articles into column A and then drag the fill handle of B1 down across many rows. Cellm will automatically send each article to the model and output the results in corresponding cells in column B.
You can reference a group of cells using standard Excel notation (this is called a "range"):
```mdx Range context theme={null}
=PROMPT("Extract all person names in the cells", A1:F10)
```
You can also reference multiple separate cell ranges:
```mdx Multiple ranges theme={null}
=PROMPT("Compare the data in these two tables", A1:C10, E1:G10)
```
### Spilling model response across multiple cells
You can use the `=PROMPT.TOCOLUMN()` function to spill the model response across multiple cells. For example, if you have text in cell A1, you can type in cell B1:
```mdx Spill to column theme={null}
=PROMPT.TOCOLUMN("Generate 10 relevant hashtags", A1)
```
This will put values in separate cells below.
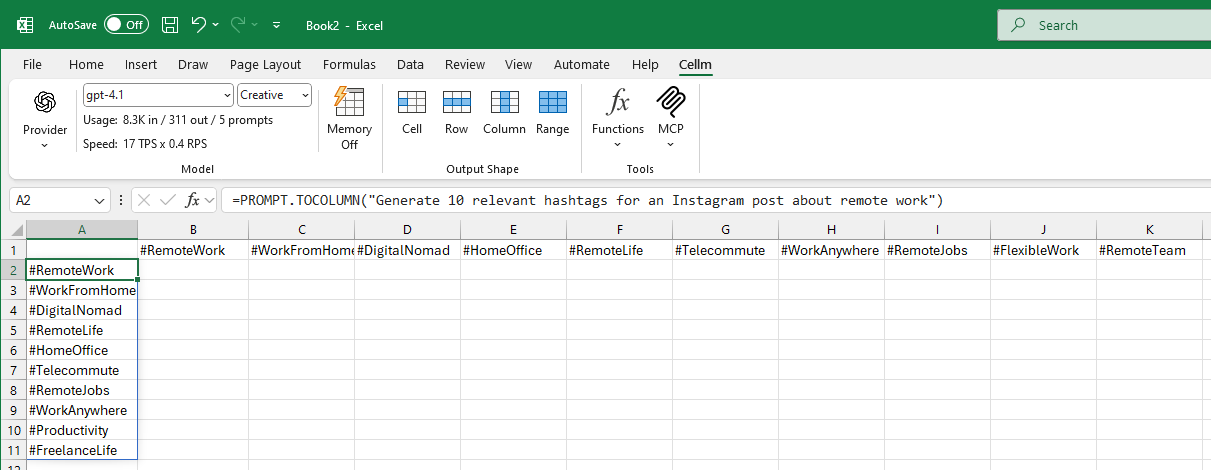 You can also use `=PROMPT.TOROW()` to spill the response across cells to the right or `=PROMPT.TORANGE()` to let the model choose whether to spill multiple values (if any) across rows and/or columns or not.
If you wish to combine multi-value output with function calling, you must use OpenAI as no other provider supports combining structured output with function calling.
### Function calling
Beyond basic text processing, you can use "Function Calling" to give models access to external tools and data and even take action in other systems. For example, expand the "Functions" menu in the Cellm ribbon tab, and click on "File Search" to enable the model to search for files on your computer. Then type:
```mdx With function calling theme={null}
=PROMPT("Which pdf files do I have in C:\Users\username\Downloads?")
```
Gemma 4 E4B does not support function calling. For function calling you must use another model, e.g. OpenAI's `gpt-5.4-mini`.
## Next steps
Learn more about prompting techniques and building automated workflows.
Learn how to split a complex task into multiple smaller ones and select the right model for your tasks' complexity.
Use Excel as a low-code task orchestrator by enabling Cellm to access external tools and data.
You can also use `=PROMPT.TOROW()` to spill the response across cells to the right or `=PROMPT.TORANGE()` to let the model choose whether to spill multiple values (if any) across rows and/or columns or not.
If you wish to combine multi-value output with function calling, you must use OpenAI as no other provider supports combining structured output with function calling.
### Function calling
Beyond basic text processing, you can use "Function Calling" to give models access to external tools and data and even take action in other systems. For example, expand the "Functions" menu in the Cellm ribbon tab, and click on "File Search" to enable the model to search for files on your computer. Then type:
```mdx With function calling theme={null}
=PROMPT("Which pdf files do I have in C:\Users\username\Downloads?")
```
Gemma 4 E4B does not support function calling. For function calling you must use another model, e.g. OpenAI's `gpt-5.4-mini`.
## Next steps
Learn more about prompting techniques and building automated workflows.
Learn how to split a complex task into multiple smaller ones and select the right model for your tasks' complexity.
Use Excel as a low-code task orchestrator by enabling Cellm to access external tools and data.